

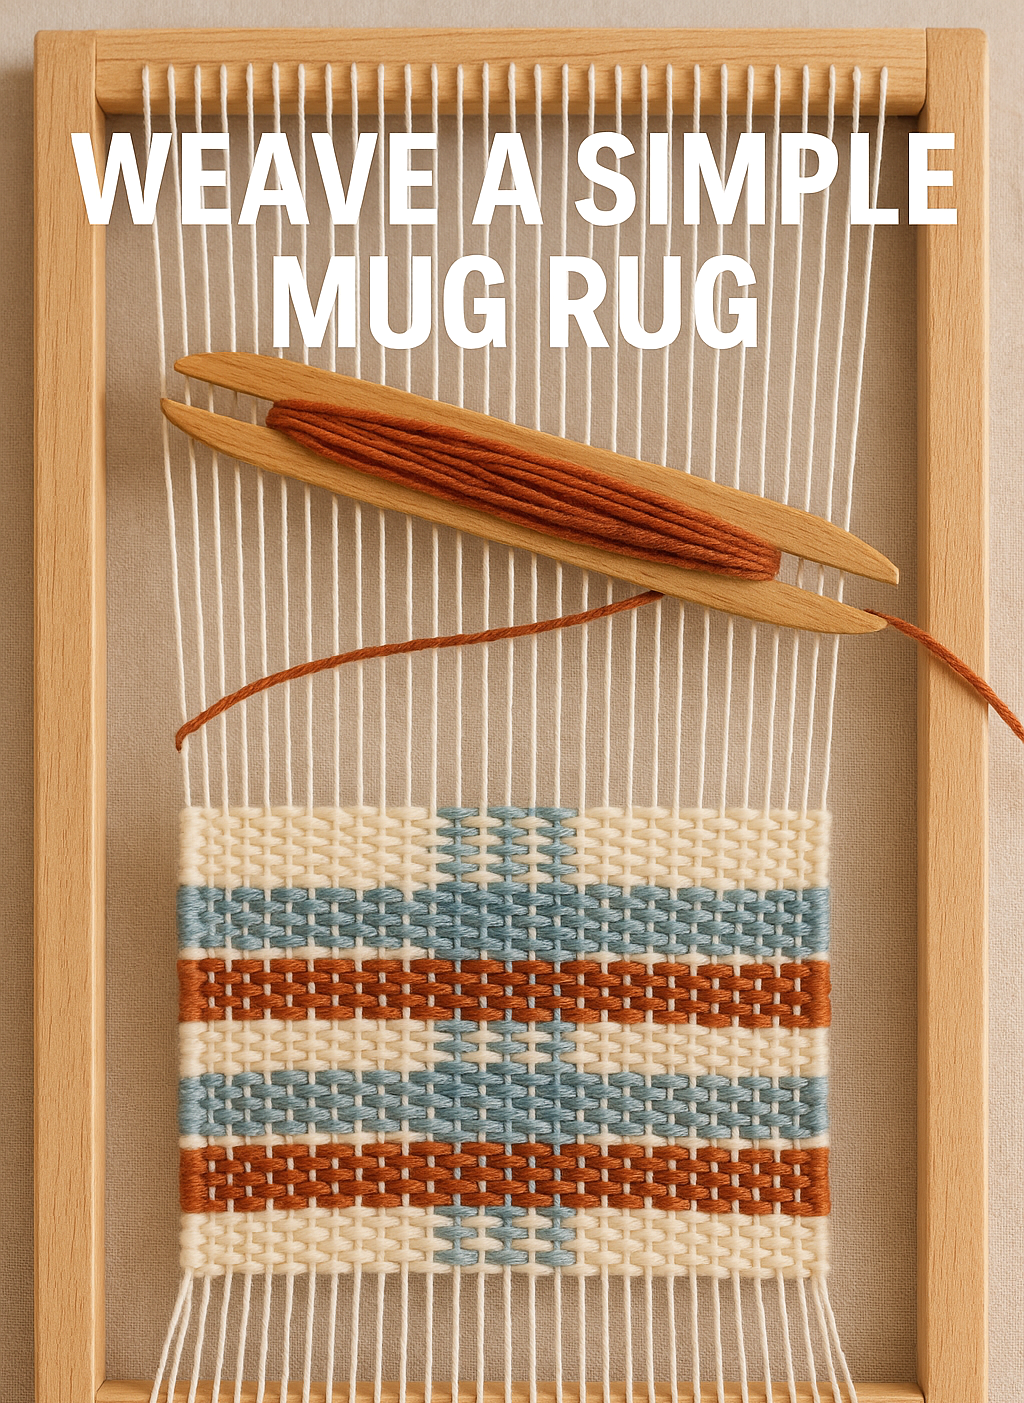
Weave a Simple Mug Rug
I remember the first time I saw someone weaving and thinking it looked impossibly complex - all those threads going in different directions, the rhythmic back-and-forth that seemed to require some kind of secret knowledge. Turns out, weaving can actually start small and simple. Today we're making a mug rug on a small loom, and it's the perfect way to get your hands moving and see how those basic over-under motions turn into actual fabric. It's quick enough to finish in an afternoon and makes either a lovely addition to your own coffee routine or a thoughtful handmade gift.
Is This Project For You?
If you're curious about weaving but don't want to commit to a massive project or expensive equipment, this is your perfect starting point. You want something you can actually finish and use, not another half-done project collecting dust. This works whether you're completely new to fiber arts or you've done other crafts and want to try weaving. You'll need a small loom (or even a simple frame loom you can make), but we're keeping everything approachable and budget-friendly. By the end, you'll have a useful little piece and enough confidence to tackle your next weaving adventure. Check out the free printable Fiber Arts Quick Guide below.

Start your journey into the fiber arts with the Fiber Starter Bundle, a thoughtfully curated digital guide designed for beginners who want to learn practical, sustainable, and meditative fiber skills. Whether you’re picking up a needle for the first time or returning to the rhythm of handwork, this bundle will guide you through foundational skills, easy patterns, and gentle encouragement rooted in tradition.
What’s Included:
Intro to fiber types and basic supplies
Simple sewing project: Hand-stitched tote bag
Beginner crochet guide: Granny square tutorial
Stitching prompts for mindfulness and creativity
Bonus tips on fiber care and sustainable mending
Create with intention, slow down with your hands, and rediscover the joy of making. Download your bundle and begin your fiber journey today.
Get The Guide
Ready to stop feeling lost every time you pick up needles or thread? This guide covers the core techniques, tools, and terms for knitting, crocheting, weaving, and simple sewing. No more guessing, just clear steps and beginner checklists so you can actually start (and finish) projects you love.
Disclosure
Some links on FiberMaiden are affiliate links. When you click and purchase, I may earn a small commission at no extra cost to you. I partner only with brands and tools I trust and use in my own kitchen, studio, and garden. Your support means a lot.


Get 3 Free Recipe Sheets
Want recipes that actually work in real kitchens? Join the club for seasonal recipes that won't leave you guessing.
Trouble Shooting and Safety
Let's talk about the things that might have you wondering if weaving just isn't for you, because we've all been there. Uneven edges are probably the most common frustration I see with new weavers. I spent my first project convinced my hands were just too clumsy for this craft because one side kept pulling in tighter than the other. The fix is gentler than you think: keep your weft thread relaxed as you weave it through, and don't pull it snug until it's completely across. Think of it like laying the thread in place rather than yanking it tight.
Loose or gappy sections usually happen when we get excited and weave too fast. Slow down and use your fingers or a fork to gently push each row up against the previous one. Consistent gentle pressure works better than occasional hard packing.
Warp threads breaking can make you want to give up entirely, but it's fixable. Tie on a new piece of the same yarn, leaving a tail on both sides that you can weave in later when you're finishing. The repair will disappear into the final piece.
If your fabric feels wobbly or loose when you take it off the loom, don't panic. A gentle hand wash and blocking will tighten everything up and even out any irregularities. Sometimes what looks like a disaster on the loom becomes a perfectly lovely finished piece once it's had that final treatment.
Frequently Asked Questions
What is a mug rug
What size should I make it
What fibers work best
Do I need batting or interfacing
Which weave structure should I use
How do I set sett and picks per inch
How do I finish the ends
How do I wash a mug rug
Can it handle very hot items
Can I gift or sell them
Fiber Arts Quick Guide
One page for yarn weights, needle & hook sizes, gauge basics, and quilt math. Keep within reach while you work.
Yarn weights at a glance
| Weight | CYC # | Knit gauge (sts/4 in) • Needles US | Crochet gauge (sts/4 in) • Hook |
|---|---|---|---|
| Lace | 0 | 33–40+ • 000–1 | 28–36+ • Steel/B–C |
| Fingering / Sock | 1 | 27–32 • 1–3 | 21–32 • B–E (2.25–3.5 mm) |
| Sport | 2 | 23–26 • 3–5 | 16–20 • E–7 (3.5–4.5 mm) |
| DK | 3 | 21–24 • 5–7 | 12–17 • 7–I (4.5–5.5 mm) |
| Worsted | 4 | 16–20 • 7–9 | 11–14 • I–K (5.5–6.5 mm) |
| Bulky | 5 | 12–15 • 9–11 | 8–11 • K–M/N (6.5–9 mm) |
| Super Bulky | 6 | 6–11 • 11–17 | 5–9 • M/N–Q (9–15 mm) |
| Jumbo | 7 | 1–6 • 17+ | 0–5 • Q+ (15 mm+) |
Always swatch. Fiber content, twist, and your tension change gauge.
Needle and hook conversions
Knitting needles (US ↔ mm)
| US | mm |
|---|---|
| 0 | 2.00 |
| 1 | 2.25 |
| 2 | 2.75 |
| 3 | 3.25 |
| 4 | 3.50 |
| 5 | 3.75 |
| 6 | 4.00 |
| 7 | 4.50 |
| 8 | 5.00 |
| 9 | 5.50 |
| 10 | 6.00 |
| 10.5 | 6.50 |
| 11 | 8.00 |
| 13 | 9.00 |
| 15 | 10.00 |
Crochet hooks (Letter ↔ mm)
| Hook | mm |
|---|---|
| B | 2.25 |
| C | 2.75 |
| D | 3.25 |
| E | 3.50 |
| F | 3.75 |
| G | 4.00 |
| 7 | 4.50 |
| H | 5.00 |
| I | 5.50 |
| J | 6.00 |
| K | 6.50 |
| L | 8.00 |
| M/N | 9.00 |
| N/P | 10.00 |
Gauge and swatch basics
- Knit or crochet a 6 × 6 in swatch. Wash and lay flat to dry.
- Measure the center 4 in square. Count stitches and rows.
- Stitches per inch: stitches in 4 in ÷ 4. Rows per inch: rows in 4 in ÷ 4.
Cast on = target width (in) × stitches per inch + 2 edge stitches.
Rows to length = target length (in) × rows per inch.
Quilt and sewing quick math
- Seam allowances: quilting 1/4 in • garments 5/8 in
- Half-square triangles (HST): cut size = finished size + 7/8 in (or add 1 in and trim to square)
- Quarter-square triangles (QST): cut size = finished size + 1 1/4 in
- Binding estimator: total length = perimeter + 12 in; strip count = ceil(total ÷ WOF). Typical strip width 2.5 in
- Prewash tips: prewash reds/darks. Press, square the grain, then cut.
Labeling and project notes
- Yarn or fabric source, colorway, lot, and fiber content
- Gauge and needle or hook size
- Pattern name and size adjustments
- Wash and care instructions
© FiberMaiden • www.fibermaiden.com


