

Fermented Garlic Honey: A Two-Ingredient Pantry Remedy
My first attempt at fermented garlic honey resulted in a jar that bubbled so vigorously I was convinced I'd created something dangerous instead of medicinal. That's when I learned that active fermentation is exactly what you want to see, and the dramatic transformation from simple ingredients into a complex, flavorful remedy is part of what makes this traditional preparation so fascinating.
A staple in folk medicine traditions, fermented garlic honey combines just two ingredients - raw garlic and raw honey - to create a sweet, pungent remedy that develops complexity through natural fermentation. This simple process harnesses beneficial bacteria and enzymes while mellowing garlic's harsh bite and creating a preparation that's both palatable and shelf-stable. The fermentation occurs naturally through wild yeasts and bacteria present on the garlic and in raw honey.
Is This Project For Me?
If you're interested in traditional food medicine and want to try fermentation without complicated equipment or ingredients, this is an accessible starting point for you. You want natural remedies you can make at home using recognizable ingredients without mystery additives or processing. This works whether you're experienced with fermentation or completely new to the process. You'll need quality raw honey and fresh garlic, plus clean jars and basic patience for the fermentation timeline. If you enjoy the idea of transforming simple ingredients into complex preparations through traditional methods, this belongs in your kitchen experimentation. Make sure to check out our free printable Herbal Quick Guide below.
Learn about Herbalism with Ease!
Elevate your herbal knowledge with our Herbal Identification Labels! These labels simplify herbal identification with detailed information and uses. Ideal for novices and beginners wishing to deepen their knowledge of common herbs and their usage, they provide a comprehensive approach to herbal identification and use. Start exploring her
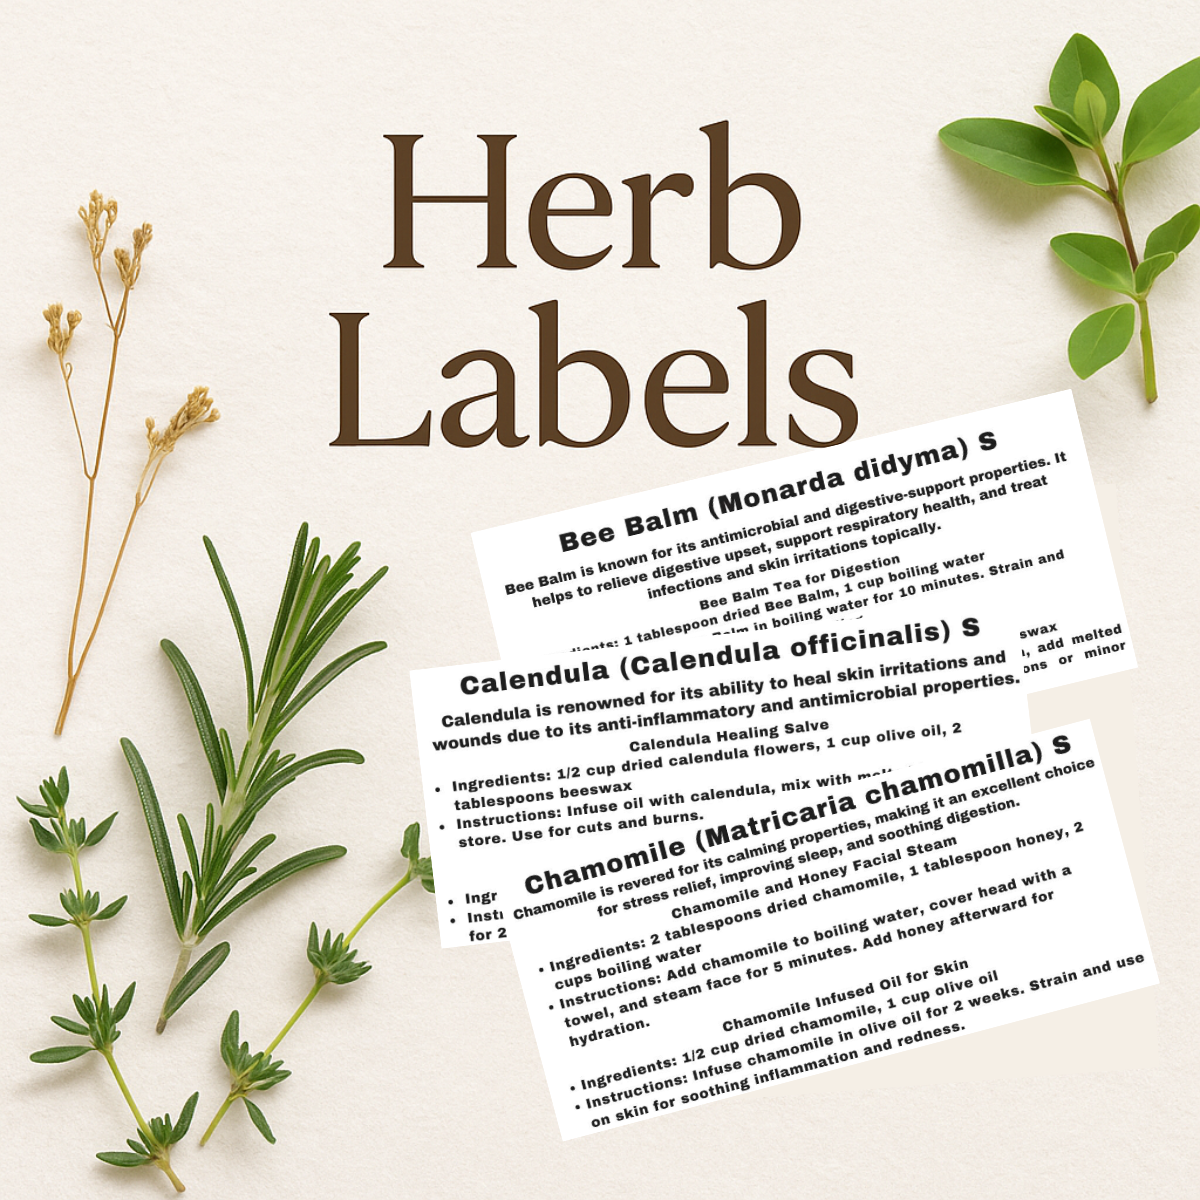
Printable Herb Labels – 4x2 Inch Format
This digital label set includes clear, easy-to-read labels for your home apothecary or herb cabinet. Each label was designed to be both beautiful and functional, offering essential details at a glance to keep your dried herbs and tincture ingredients organized.
Created with the home herbalist in mind, these labels are perfect for mason jars, spice jars, paper bags, and storage tins.
What’s Included
A printable PDF file with over 40 labels for herbs, roots, and mushrooms including classics like Chamomile and Lavender, but also new herbs to explore like Meadowsweet and Skullcap.
Each label includes:
– Common name
– Scientific name
– Function (Primary, Supportive, or Active)
– Common uses
– Two simple traditional use recipesSized for 4x2 inch adhesive labels or printable sheets
Designed for home printing in black and white to reduce ink use
How to Use
Print at home on 4x2 inch label sheets or plain paper. Trim and tape, glue, or adhere to jars as needed. These labels are a great addition to herbal kits, medicine-making supplies, or pantry storage.
Why It’s Useful
Having a summary of the herbs information and two quick recipes on every jar of herbs will encourage you to use them. It also helps prevent confusion and supports safe, confident use. These labels were designed by someone who regularly works with herbs and knows how helpful it is to have key information right at your fingertips.
Delivery
You’ll receive an instant download of the PDF file after purchase. Print as many copies as you need for your personal use.
Build your apothecary with confidence and clarity.
Download your printable labels and start organizing your herbal supplies today.
Get The Labels
Finally know what's in every jar without playing herbal roulette. These printable labels give you clear, readable information for your herbal collection - common names, uses, and simple recipes right where you can see them. No more mystery herbs or accidentally seasoning dinner with something meant for tea.
Disclosure
Some links on FiberMaiden are affiliate links. When you click and purchase, I may earn a small commission at no extra cost to you. I partner only with brands and tools I trust and use in my own kitchen, studio, and garden. Your support means a lot.
Disclaimer
I share what I use in my own home apothecary so you can learn and get inspired. This is education, not medical advice. Everyone’s body is different, especially with allergies, medications, children, and pregnancy. Patch test, start small, and talk with your doctor.

/https://media.azurestandard.com/files/bc3fb923-8ebc-46bb-b8b9-3f9308cb4e6d)
/https://media.azurestandard.com/files/0fbbe337-3972-434f-b45a-ab9f0cb0c3e2)

Get 3 Free Recipe Sheets
Ready for recipes that don't require a culinary degree to follow? Get seasonal recipe sheets designed for real kitchens and busy lives, the kind that work even when your kids are asking for snacks mid-prep..
Troubleshooting and Safety
No fermentation activity after several days: Your honey may be too processed or your garlic wasn't fresh enough to provide adequate wild yeasts. Try using different raw honey from local sources, or add a small amount of raw apple cider vinegar to kickstart fermentation.
Mold growth on surface: All garlic pieces must stay submerged under honey to prevent mold. Use a clean weight or stir daily to keep garlic covered. Any sign of fuzzy mold means discarding the batch and starting over with better submersion techniques.
Fermentation too active or overflowing: This is normal with very fresh garlic and active honey. Use larger jars than you think necessary, or transfer to bigger containers if bubbling becomes excessive. Place jars on plates to catch any overflow.
Garlic turning blue or green: This color change can occur due to enzymes reacting with trace minerals and is generally harmless, though it may indicate the garlic wasn't perfectly fresh. The preparation is usually still safe to consume if it smells and tastes normal.
Too strong or harsh flavor: Fermentation mellows garlic over time. If it's still too intense after several weeks, dilute individual doses in warm water or tea rather than taking straight. Some people need to build up tolerance gradually.
Uncertain about safety: Fermented foods carry inherent risks if not prepared properly. Trust your senses - if anything smells off, looks wrong, or tastes strange beyond normal fermentation flavors, err on the side of caution and start fresh.
Frequently Asked Questions
Herbal Quick Guide
One page for common preparations, simple ratios, storage, and safety. Education only, not medical advice.
Patch test first. Avoid on broken skin unless a recipe specifically says otherwise. Check for allergies and medication interactions. If pregnant, nursing, or caring for children, talk with a qualified practitioner.
Common preparations
| Method | What it is | Basic ratio | Time | Use notes |
|---|---|---|---|---|
| Hot infusion (tea) | Steeping delicate leaves or flowers in hot water | 1 to 2 tsp dried herb per 8 oz water | 5 to 15 minutes | Cover while steeping. Drink warm or cool. Refrigerate leftovers. |
| Cold infusion | Soaking delicate or mucilaginous herbs in cool water | 1 to 2 tbsp dried herb per 16 oz water | 4 to 12 hours in fridge | Great for marshmallow leaf or linden. Strain well. |
| Decoction | Simmering tougher roots, barks, or seeds | 1 tbsp dried herb per 16 oz water | 15 to 30 minutes gentle simmer | Keep lid on. Refrigerate after cooling. |
| Oil infusion | Extracting constituents into oil | Fill jar half with dried herb, cover fully with oil | 2 to 3 weeks room temp or 1 to 2 hours warm bath | Use very dry herbs. Strain fine. Store cool and dark. |
| Herbal syrup | Sweetened decoction or strong tea | Equal parts strong tea and honey or sugar by volume | Stir warm until dissolved | Refrigerate. Good for kids. Label with date. |
| Oxymel | Vinegar and honey extraction | 1 part herbs, 2 parts vinegar, 1 part honey | 1 to 2 weeks, shake daily | Strain. Store cool and dark. |
| Compress | Cloth soaked in tea placed on skin | Strong tea as needed | Apply 10 to 20 minutes | Use warm or cool. Patch test first. |
| Poultice | Moist herb applied directly then covered | Freshly mashed or rehydrated dried herb | 10 to 30 minutes | Use on unbroken skin. Remove if irritation occurs. |
Simple ratios and textures
| Preparation | Basic ratio | Notes |
|---|---|---|
| Salve or balm | Oil to beeswax: soft 1 cup to 0.7 oz, standard 1 cup to 1.0 oz, firm 1 cup to 1.2 oz | Adjust wax for texture and climate. |
| Body butter base | Butter to oil to wax: 2 to 1 to 0.2 by weight | Whip after cooling for fluffier texture. |
| Bath soak | Herbs to salts: 1 to 3 by volume | Bag loose herbs for easier cleanup. |
| Vinegar infusion | Jar half full dried herbs, fill with vinegar | Use glass and non-metal lid liner. |
Storage guide
| Preparation | Typical shelf life | Storage notes |
|---|---|---|
| Dried herbs | 6 to 12 months | Cool, dark, airtight. Whole pieces keep longer than powders. |
| Infusions and decoctions | 24 to 72 hours refrigerated | Label and date. Discard if off smell or cloudiness appears. |
| Herbal syrup | 2 to 4 weeks refrigerated with honey, 4 to 6 weeks with sugar | Use clean utensils to avoid contamination. |
| Oil infusion | 6 to 12 months | Dry herbs only. Store cool and dark. |
| Salve or balm | 6 to 12 months | Cool, dark place. Discard if rancid smell develops. |
| Oxymel or vinegar infusion | 6 to 12 months | Tight lid. Store cool and dark. |
Labeling checklist
- Herb name and Latin name if known
- Preparation type (tea, decoction, oil, syrup, oxymel, salve)
- Ratio and carrier (for oils: olive, jojoba, etc.)
- Date made and best by date
- Any safety notes specific to the herb
Your notes
© FiberMaiden • www.fibermaiden.com


